阅读感想:
- 阅读源码前,必须对项目对外暴露的API,有大致的了解。
- 有了上面的基础,开始从入口,进行阅读。
- 阅读常用的API实现。
- 阅读的时候,要猜。由功能猜实现,对源码进行理解。
本文是对react-redux@5.0.4的源码分析,阅读中添加了注释的代码react-redux-analysis
react-redux的API参考 链接
react-redux在5.0中做出了很大改动。 请参考
作者为了react-redux在实际项目中可定制化,重写了connect,分成了很多模块组件。
让connect作为了connectAdvanced的门面(外观模式)。
更新后的文件结构如下:
Provider
provider组件包裹整个APP,通过Props将store传入。使的通过connect()(component)生成的容器组件,可以获取到store。
Provider使用方法1
2
3
4
5
6ReactDOM.render(
<Provider store={store}>
<MyRootComponent />
</Provider>,
rootEl
)
如何实现?
Provider组件通过使用react提供的顶层API context特性实现。getChildContext1
2
3getChildContext() {
return { store: this.store, storeSubscription: null }
}
childContextTypes1
2
3
4Provider.childContextTypes = {
store: storeShape.isRequired,
storeSubscription: subscriptionShape
}
这样,通过connect()(wrappedcomponent)生成的容器组件中,可以通过设置contextTypes,
在组件内部可以通过this.context.store获取到store,对状态进行操作。1
2
3Component.contextTypes = {
store: storeShape.isRequired,
};
connect
首先通过react-redux的链接充分理解connect的使用。connect([mapStateToProps], [mapDispatchToProps], [mergeProps], [options])
作用是,在Redux store和React Component之间建立起联系。connect方法是connectAdvanced的门面(外观模式),为大多数情况下的使用,提供便利的API,
也就是说connect方法简化了connectAdvanced的API。connect的具体接口如下:1
2
3
4
5
6
7
8connect(
mapStateToProps(state,ownProps)=>stateProps:Object,
mapDispatchToProps(dispatch, ownProps)=>dispatchProps:Object,
mergeProps(stateProps, dispatchProps, ownProps)=>props:Object,
options:Object
)=>(
component
)=>component
可以做出如下猜想判断:
- 使用该方法后,返回一个包裹原先定义的xxxComponent的新的newReactComponent
- connect方法执行后返回
wrapWithConnect函数,在其内部形成一个闭包,保存了传入的mapToProps(选择器)等信息。
并且执行该函数后,返回包裹后的newReactComponent,而该组件通过render原组件,形成对原组件的封装。 - 渲染页面需要store tree(通过
context获取provider中的store)中的state片段,变更state需要dispatch action,这两处信息,就是在调用connect时,作为参数传入的mapStateToProps函数和mapDispatchToProps函数,这两个函数过滤state和ownprops后生成的props,connect包裹后形成的newReactComponent组件通过设置原组件的props属性传入信息到原组件。
选择器
更多参考reselectmapStateToProps
顾名思义该函作用是 state映射生成Props,可以看做是一个selector
react-redux内部调用该函数,并把state作为参数传入mapDispatchToProps
顾名思义该函作用是 dispatch映射生成Props,可以看做是一个selector
在函数定义时,引用外部自定义action,在react-redux内部调用该函数,并把store.dispatch作为参数传入
以上都是通过react-rdux最常用的方式以及API可以分析出的结果。
具体实现 connect.js
1 | export function createConnect({ |
可以看出connect函数是通过createConnect函数创建。createConnect在声明的时候就提供了很多默认参数,内部的connect可以使用这些默认参数。connect在声明的时候也提供了很多默认参数,mapStateToProps,mapDispatchToProps,mergeProps,extraOptions
这些参数是要在connect被调用的时候,由使用者提供的。当然也都可以省略。
执行connect(...args)最后返回的是connectHOC(...args)。 而connectHOC = connectAdvanced,
可知执行connectAdvanced(...args)返回函数(wrappedcomponent)=>newComponent;
其实这个新组件就是connectAdvanced.js中定义的Connect组件(整合了wrappedComponent的props)
具体实现connectAdvanced.js
首先看connectAdvanced的signature(selectorFactory,{...options})=>(YourComponent)=>ConnectComponent,
使用方法如下:
1 | connectAdvanced((dispatch, options) => (state, props) => ({ |
在connectAdvanced方法内部定义了要返回的ConnectComponent,构造函数部分代码如下:1
2
3
4
5
6
7
8
9
10
11
12
13
14
15
16
17
18
19
20
21
22
23
24
25
26
27
28
29
30 // ...
// ...
class Connect extends Component {
constructor(props, context) {
super(props, context)
this.version = version
this.state = {}
this.renderCount = 0
//获取store的方式:
//1.通过props传递store,<connectedComponent store={innerStore}>
//2.通过context获取store,<Provider store={outStore}>
//通过props获取store的方式优先级更高
this.store = props[storeKey] || context[storeKey]
this.propsMode = Boolean(props[storeKey])
this.setWrappedInstance = this.setWrappedInstance.bind(this)
invariant(this.store,
`Could not find "${storeKey}" in either the context or props of ` +
`"${displayName}". Either wrap the root component in a <Provider>, ` +
`or explicitly pass "${storeKey}" as a prop to "${displayName}".`
)
//初始化selector,selector的作用是:通过过滤state和ownProps生成,生成wrappedComponent的props。
this.initSelector()
//初始化subscription,subscription作用:监听state和ownProps的变化,触发wrappedComponent更新。
this.initSubscription()
}
// ...
// ...
}
如何生成wrappedComponent组件的props的?
生成props主要是通过selector函数,在构造函数中通过this.initSelector()初始化了this.selector对象。
代码分析:1
2
3
4
5
6
7
8
9
10
11
12
13
14
15
16
17
18
19
20
21
22
23
24
25
26
27
28
29
30
31
32
33
34
35
36
37function makeSelectorStateful(sourceSelector, store) {
// wrap the selector in an object that tracks its results between runs.
const selector = {
run: function runComponentSelector(props) {
try {
//此处看出nextProps由sourceSelector函数传入state和props计算得来。
const nextProps = sourceSelector(store.getState(), props)
if (nextProps !== selector.props || selector.error) {
selector.shouldComponentUpdate = true
selector.props = nextProps
selector.error = null
}
} catch (error) {
selector.shouldComponentUpdate = true
selector.error = error
}
}
}
return selector
}
class Connect extends Component {
initSelector() {
//selectorFactory生成sourceSelector。
const sourceSelector = selectorFactory(this.store.dispatch, selectorFactoryOptions)
//this.selector具有记忆功能,如果通过sourceSelector计算后的nextProps和现在的this.props不同,则说明组件需要更新。
this.selector = makeSelectorStateful(sourceSelector, this.store)
this.selector.run(this.props)
}
//收到新的props时调用
componentWillReceiveProps(nextProps) {
this.selector.run(nextProps)
}
//通过this.selector.shouldComponentUpdate判断组件是否需要更新,优化性能。
shouldComponentUpdate() {
return this.selector.shouldComponentUpdate
}
}
react生命周期参考
初始化挂载阶段
- constructor()
- componentWillMount()
- render()
- componentDidMount()
更新阶段
- componentWillReceiveProps()
- shouldComponentUpdata()
- componentWillUpdate()
- render()
- componentDidUpdate()
卸载阶段
- componentWillUnmount()
返回的ConnectComponent是如何渲染wrappedComponent的?
上源码1
2
3
4
5
6
7
8
9
10render() {
const selector = this.selector
selector.shouldComponentUpdate = false
if (selector.error) {
throw selector.error
} else {
return createElement(WrappedComponent, this.addExtraProps(selector.props))
}
}
从代码可以看出,在ConnectComponent的render函数中,使用createElement创建了WrappedComponent也就是YourComponent,
并且添加了额外的属性this.addExtraProps(selector.props)。
ConnectComponent是如何监听store变化,然后决定重新渲染的?
我们知道当react组件的state或者props改变,组件就会重新渲染,
react提供的方法有setState和forceUpdate这两个方法。
可以按照这两个线索寻找。
主要代码如下:1
2
3
4
5
6
7
8
9
10
11
12
13
14
15
16
17
18
19
20
21
22
23
24
25
26
27
28
29
30
31
32
33class Connect extends Component {
constructor(){
...
this.initSubscription()
}
initSubscription() {
if (!shouldHandleStateChanges) return
// parentSub's source should match where store came from: props vs. context. A component
// connected to the store via props shouldn't use subscription from context, or vice versa(反之亦然).
//如果组件通过props连接store,则不应该从context获取subscription。
const parentSub = (this.propsMode ? this.props : this.context)[subscriptionKey]
this.subscription = new Subscription(this.store, parentSub, this.onStateChange.bind(this))
// `notifyNestedSubs` is duplicated to handle the case where the component is unmounted in
// the middle of the notification loop, where `this.subscription` will then be null. An
// extra null check every change can be avoided by copying the method onto `this` and then
// replacing it with a no-op on unmount. This can probably be avoided if Subscription's
// listeners logic is changed to not call listeners that have been unsubscribed in the
// middle of the notification loop.
this.notifyNestedSubs = this.subscription.notifyNestedSubs.bind(this.subscription)
}
onStateChange() {
this.selector.run(this.props)
if (!this.selector.shouldComponentUpdate) {
this.notifyNestedSubs()
} else {
this.componentDidUpdate = this.notifyNestedSubsOnComponentDidUpdate
this.setState(dummyState)
}
}
}
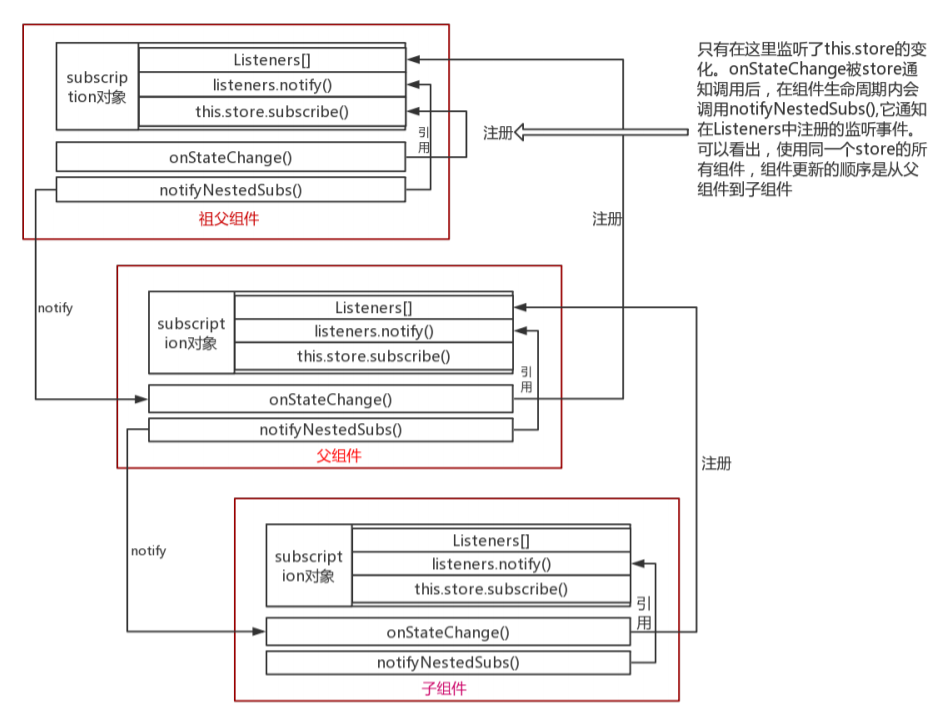
其中这段代码this.subscription = new Subscription(this.store, parentSub, this.onStateChange.bind(this))
作用是store的变化,就会触发onStateChange,这个函数调用会触发this.setState。这样ConnectComponent组件更新,
触发该组件render,同时子组件YourComponent即wrappedComponent的更新也会被触发,
为了提高渲染效率, ConnectComponent使用了shouldComponentUpdate判断,是否执行render,
如果返回true,不用触发render,则子组件也不必更新。
Component更新流程
结合utils/Subscription.js源码,可以理解整个系统中组件的更新流程。
如图: